(The wise men) |
Tag: Visual edit |
||
| (32 intermediate revisions by 8 users not shown) | |||
| Line 1: | Line 1: | ||
[[File:Happy Wars - Special Challenge (Game 2)-0|thumb|right|180px|Gameplay of the Special Challenge]] |
[[File:Happy Wars - Special Challenge (Game 2)-0|thumb|right|180px|Gameplay of the Special Challenge]] |
||
| + | <gallery type="slideshow" widths="269"> |
||
| − | |||
| + | imgres.jpg|The Plundering Pirate's Special Challenge |
||
| − | |||
| ⚫ | |||
| − | |||
| + | The wise men.jpg|The Wise Men Special Challenge |
||
| − | |||
| + | Hw.jpg|The Trounce Abyssal Army |
||
| − | |||
| + | Special challenge revival part 1.jpg|The Special Challenge Revival Part 1 |
||
| − | Numerous Special Challenge Modes Are Now Being Seen |
||
| + | Trounce heaven's hosts.jpg|The Trounce Heaven's Host Special Challenge |
||
| − | |||
| + | Castle defense.jpg|The Castle Defense Part 1 Special Challenge |
||
| − | The reward system for Special Challenge has now changed too so you no longer need to be MVP to get a Super Chest. |
||
| + | happywars.jpg|The Special Challenge Revival Part 2 |
||
| − | |||
| + | </gallery> |
||
| − | Points are awarded for your position |
||
| − | |||
| − | MVP = 100 |
||
| − | |||
| − | 2nd = 90 |
||
| − | |||
| − | 3rd =80 |
||
| − | |||
| − | 4th = 70 |
||
| − | |||
| − | etc.... |
||
| − | |||
| − | |||
| − | {| border="0" cellpadding="1" cellspacing="1" class="article-table article-table-selected" style="width: 600px; " |
||
| − | |- |
||
| − | ! scope="col"|Blue Chest |
||
| − | ! scope="col"|Blue Chest |
||
| − | ! scope="col"|Blue Chest |
||
| − | ! scope="col"|Blue Chest |
||
| − | ! scope="col"|Gold Chest |
||
| − | |- |
||
| − | |100 |
||
| − | |200 |
||
| − | |300 |
||
| − | |400 |
||
| − | |500 |
||
| − | |- |
||
| − | | |
||
| − | | |
||
| − | |800 |
||
| − | | |
||
| − | | |
||
| − | |} |
||
| − | |||
| − | |||
==Rules of Special Challenge== |
==Rules of Special Challenge== |
||
| − | *All [[Towers]] are controlled by the enemy at the start. |
+ | *All [[Towers]] are controlled by the enemy at the start. |
*Causing even a slight amount of damage to an enemy Tower will result in a Slayer spawning. |
*Causing even a slight amount of damage to an enemy Tower will result in a Slayer spawning. |
||
| − | * |
||
| ⚫ | |||
*Slayers consist of a Warrior Slayer, Cleric Slayer, and Mage Slayer. |
*Slayers consist of a Warrior Slayer, Cleric Slayer, and Mage Slayer. |
||
| ⚫ | |||
| − | |||
| − | *Slayers are easily identified by the Tag above their head, as well as their [[File:Special_Challenge_3.png|thumb|The Carnival Clowns Special Challenge]][[File:The_wise_men.jpg|thumb|The Wise Men special Challenge]][[File:Trounce_Heaven's_Host.jpg|thumb|The Trounce Heaven's Host Challenge.]]giant like size.[[File:Happywars.jpg|thumb|180px|Special Challenge Revival Part 2]] |
||
| ⚫ | |||
*You can only win the game by destroying the Big Tower. |
*You can only win the game by destroying the Big Tower. |
||
| − | + | : Bonus Monsters spawn at seemingly random points in the game. They often distract players from the objective, and can easily cause a winning game to end in a loss. Gold, which is the advanced version of the Bonus monster, will rarely attack players in her way. She can mostly one hit player, but has no defence except her speed. Sometimes, she will sucide either by falling off, falling in water, or get killed by terrain (Posion Water, Evil Fishies, etc.) |
|
*A treasure Box containing [[Happy Stars]] or a special item is rewarded upon completion of a Special Challenge. |
*A treasure Box containing [[Happy Stars]] or a special item is rewarded upon completion of a Special Challenge. |
||
==Special Challenge Reward System== |
==Special Challenge Reward System== |
||
| + | [[File:Ss+(2018-01-30+at+06.45.25).jpg|thumb|220x220px|Co-op rewards.]] |
||
| + | Special Challenge has two difficulties: Easy mode which has weaker AI's, a lower chance to drop a special item and |
||
| + | less co-op points, and hard mode which gives out special rewards at an increased rate, the AI however are tougher than normal. You get extra co-op points for completing hard mode. |
||
| − | Special Challenge has two difficulties: Easy mode which has 4 basic items and weaker AIs, and Hard mode which has extremely powerful AIs and 3 premium items and 1 super premium item. Despite appearances, players do not have a 1 out of 4 chance of getting a premium item or a 1 out of 16 chance at the super premium item. |
||
| + | Introduced as a more recent addition, Special Challenges now feature a boss killing reward at the end of every game. The more damage you do to the big boss at the end, the greater your chances of getting a special item at the end of the game. Putting the buff "Monster Slayer" on your weapon will allow you do to more damage to bosses, and thus, increase the chance of getting a special item. |
||
| − | Players who win are also given the option after the game to upgrade their Treasure Box to a Super Treasure box using Happy Tickets if they choose. If one chooses to upgrade their Treasure Box, this will cost them 8 Happy Tickets for easy mode and 18 for hard mode. |
||
| + | |||
| + | You can also sometimes earn special items in the Co-op rewards section. |
||
==Special Challenge Enemies== |
==Special Challenge Enemies== |
||
| − | There are major differences in the enemies. Most AIs behave like normal Co-op AIs, but they[[File:Special-Challenge-Big-boss.jpg|thumb|The Boss.]] have the Slayers joining them to fight. The Slayers high attack and defense numbers alone cause allies major problems, but added to that Slayers are given a 40% damage boost to their designated slaying class. Having even one Slayer out, or worse all of them combined, can make the game almost impossible for players to win. If the team can make it to the castle after taking all Towers and killing all Slayers that spawn from them, they are faced with a more difficult opponent: The Boss known simply as DANGER! With extremely high Attack and Defense numbers and a swing radius half the length of the castle, this opponent can clear the castle of players in mere |
+ | There are major differences in the enemies. Most AIs behave like normal Co-op AIs, but they[[File:Special-Challenge-Big-boss.jpg|thumb|The Boss.]] have the Slayers joining them to fight. The Slayers' high attack and defense numbers ''alone'' can cause allies major problems, but added to that Slayers are given a 40% damage boost to their designated slaying class. Having even one Slayer out, or worse all of them combined, can make the game almost impossible for players to win. If the team can make it to the castle after taking all Towers and killing all Slayers that spawn from them, they are faced with a more difficult opponent: The Boss known simply as DANGER! With extremely high Attack and Defense numbers and a swing radius half the length of the castle, this opponent can clear the castle of players in mere seconds of its arrival. |
==Special Challenge Strategy== |
==Special Challenge Strategy== |
||
| Line 74: | Line 40: | ||
There are two big decisions to make when trying to complete a Special Challenge: |
There are two big decisions to make when trying to complete a Special Challenge: |
||
| − | =='''1. Will you try to capture the Towers on the way to the enemy castle?'''== |
+ | ==='''1. Will you try to capture the Towers on the way to the enemy castle?'''=== |
| − | + | It is only recommended to take the Towers if you face the "Major Enemy" or on small to medium maps if you are confident in your teammates' abilities to kill or control the Slayers that will spawn. Note: The Slayers deal massive damage to your towers. Hold them down as best as you can. |
|
| ⚫ | '''No: '''Split your team between offense and defense, and go for a base rush. Have Clerics with dispel on defense, to keep your castle and your Big Tower safe. Then have some players go rush straight to the enemy castle. It is recommended to have at least two Clerics with resurrect, and two other players with high construction skills. Do not attack the enemy gate or touch the enemy Towers before you build the [[Battering ram|ram]]. Once you build the ram everyone should use it at the same time so it does extra damage. If the ram is broken, then attack the [[Gates|Gate]]. |
||
| − | control the Slayers that will spawn. Note: The Slayers deal massive damage to your towers. Hold them down as best as you can. |
||
| ⚫ | |||
| ⚫ | '''No: '''Split your team between offense and defense, and go for a base rush. Have Clerics with dispel on defense, to keep your castle and your Big Tower safe. Then have some players go rush straight to the enemy castle. |
||
| ⚫ | |||
| ⚫ | |||
| + | It is not recommended to try to kill the Boss Monster as it can be difficult and generally takes a long time. That is, unless you're interested in earning rewards. Many weekly missions require killing the boss, and it gives a huge boost to your progress towards co-op rewards. No guts, no glory! |
||
| ⚫ | |||
| ⚫ | '''No: '''It is easier to destroy the enemy Big Tower without killing DANGER by having multiple players, preferably with high construction skill, go straight for it while other players use the Cleric's Resurrect skill from atop the castle walls to revive them when they die. Just remember, VERY rarely the Boss (Rackham, Kentaur, Yggdrasil, Klymenos, Cassandro, Typhon, etc., the huge guy) will LEAVE the castle and advance towards your own. Things get slightly easier here, but he can smash your gates in seconds and can destroy your big tower almost immediately. |
||
| − | I do not recommend trying to kill the Boss Monster as it can be difficult and generally takes a long time. |
||
| + | '''Yes:''' If you do decide to kill DANGER, the best strategy to fight him is to construct and use the [[Flower Cannon]] outside and the [[Ballista|Ballistae]] inside the opponents' base and shoot him to death. Make sure the character class firing the cannon is not one the boss is immune to. Your team can also surround the boss with a mass attack using the character class he's not immune to. He'll freeze up and only be able to get a swing in every few seconds, making it easy to kill him quickly. |
||
| ⚫ | '''No: '''It is easier to destroy the enemy Big Tower without killing DANGER by having multiple players, preferably with high construction skill, go straight for it while other players use the Cleric's Resurrect skill from atop the castle walls to revive them when they die. Just remember, VERY rarely the Boss (Rackham, Kentaur, Yggdrasil, Klymenos, Cassandro, Typhon, etc., the huge guy) will LEAVE the castle and advance towards your own. Things get slightly easier here, but he can smash your gates in seconds and destroy your big tower almost immediately. |
||
| + | [[Category:Online Multiplayer]] |
||
| + | [[Category:Co-op]] |
||
| ⚫ | |||
| + | ==Castle Defense== |
||
| − | '''Yes:''' If you do decide to kill DANGER, the best strategy to fight him is to construct and use the [http://happywars.wikia.com/wiki/Flower_cannon Flower Cannon] outside and the [[Ballista]]s inside the opponents' base and shoot him to death. |
||
| − | |||
| ⚫ | |||
Castle defense mode is a special challenge that differs from your average special challenge in the following ways: |
Castle defense mode is a special challenge that differs from your average special challenge in the following ways: |
||
*Most of the map is blocked off. |
*Most of the map is blocked off. |
||
| Line 98: | Line 65: | ||
*You must stop a horde of enemies from taking down your big tower. |
*You must stop a horde of enemies from taking down your big tower. |
||
*Slayers are weaker and only come in one wave. |
*Slayers are weaker and only come in one wave. |
||
| ⚫ | |||
| − | *There is no "Danger!!" |
||
| ⚫ | |||
| ⚫ | |||
| ⚫ | New enemies also make an apperance. '''Attack proof''' is a monster that obviously takes almost no damage from regular attacks. '''Ballista proof''' is a monster that obviously takes almost no damage from ballistae. '''Magic proof''' is a monster which obviously takes almost no damage from magic attacks. '''Bomb monster''' are monsters that have a considerably good amount of HP. When it is killed, it explodes, which has a high chance of instantly killing a player. And finally, the '''Gate Crasher''', which is a monster that doesn't attack, but is a drilling monster which moves slowly. When it touches your castle gate, it will destroy it. |
||
| ⚫ | |||
| ⚫ | |||
| − | *The boss monster doesn't spawn |
||
| + | ===Tips=== |
||
| ⚫ | New enemies also make an apperance. '''Attack proof''' is a monster that obviously takes almost no damage from regular attacks. ''' |
||
| ⚫ | |||
| − | |||
| ⚫ | |||
| − | *Dont get upset if you cant beat this special challenge. This is the hardest challenge released by Toylogic up to date! I usually can't even get past wave 5. |
||
| ⚫ | |||
*4-5 players outside is OK. |
*4-5 players outside is OK. |
||
| − | * |
+ | *Remember This: There's only 8 of you on the ally team and hordes of enimies. Balance your teams positions wisely. |
| − | *Having |
+ | *Having Tactical Power Up and Cannon (Durability, Shots, Accuracy) Buffs helps a lot when on a Ballista/Gatling Gun. |
| − | *Be aware of your surroundings. Enemies in this mode love to sneak to the sides of the Castle and build |
+ | *Be aware of your surroundings. Enemies in this mode love to sneak to the sides of the Castle and build ladders. Especially on Wave 4. |
| − | *On |
+ | *On Wave 4, it is best to stay inside beacuse enemies build ladders a lot on this wave. |
| − | *Dispel works wonders on Castle Defense. Use it to remove |
+ | *Dispel works wonders on Castle Defense. Use it to remove Summoned Materials for cannons, rams, and ladders. |
| − | *Complete your waves as quick as possible. Remember, you have a time limit. |
+ | *Complete your waves as quick as possible. Remember, you have a time limit. Completing the waves quickly will also result in a bonus Happy Meat. |
| − | *Happy |
+ | *Happy Meat is meat gained for every 150exp you earn. At the end of each wave, you can spend your meat on more HP, AP, fortify a cannon, enhance your magic attack or attack, or spend it on more meat, making it require less exp for meat. |
| − | *Use Cheer or |
+ | *Use Cheer or Sacred Song or Meteor Storm in between waves. |
*When your gate is breached, use a Beserker or Zephyr to keep enemies away from the big tower. A Cleric's wall also helps. |
*When your gate is breached, use a Beserker or Zephyr to keep enemies away from the big tower. A Cleric's wall also helps. |
||
| − | *Use |
+ | *Use Ballistae and magic attacks for Slayers, Proof-Golems (Attack, Magic, etc.(depending on Golem)), and Gate Crushers. |
| − | *Communicate with your ally team |
+ | *Communicate with your ally team, use mics or invite them to a party since Castle Defense has only 8 players. |
| + | *Engineers are invaluable teammates as they can update materials and even repair the gate to keep defenses up as long as possible. It is usually recommended to keep them inside to castle to attack with Ballistae/Gatling Guns. |
||
| − | *The game is kinda glitched. If it is still on wave 1 after the first few minutes, leave. Wave one should be done in no time. |
||
| + | *Try to prevent the gate from being destroyed as long as possible. Having it destroyed will likely force the entire team to stay within the castle walls, which will often leads to more enemies entering the castle due to the lack of defenses outside the walls; enemies will also build ladders to enter the castle, which will cause enemies to come from three directions to the tower. |
||
| + | |||
| + | ===Notes=== |
||
| + | Occasionally, the game will glitch during/after Round 1. This causes a new wave of enemies to appear along with them having strange behaviors. Because of this, it will often result in the players running out of time. |
||
| + | |||
| + | ==Boss Crushers== |
||
| + | This Special Challenge is an endurance-type match. As of right now, it only has appeared mid-March 2014. |
||
| + | ===Rules=== |
||
| + | *There are 5 stages, as well as 3 bonus stages for teams that clear with at least 2 minutes remaining. |
||
| + | *Defeat the boss(es) of each round to advance. |
||
| + | *You have to clear all 5 rounds, or else you lose. |
||
| + | *Destroying the Big Tower has no effect on the match. |
||
| + | The Rounds have a pre-determined set of bosses to choose from. Below is the list: |
||
| + | |||
| + | ===Boss List=== |
||
| + | Each bullet point represents one group of bosses. |
||
| + | ====Round 1==== |
||
| + | *Class Slayer Team (x Regular Slayers, 1 Super Slayer) |
||
| + | *Golem Team (1 Resist-Attack, Resist-Ballista, 1 Resist-Magic) |
||
| + | ====Round 2==== |
||
| + | *Lineman |
||
| + | *Bomb Monster |
||
| + | ====Round 3==== |
||
| + | *Thinking Bird (x5) |
||
| + | *Vampire |
||
| + | *Spartan Team |
||
| + | ====Round 4==== |
||
| + | *Werewolf (x3) |
||
| + | *Dwarf Family |
||
| + | *Dark Princess |
||
| + | ====Round 5==== |
||
| + | This round comes in two phases. |
||
| + | =====Phase 1===== |
||
| + | *Demon Lemur Statue (x3) |
||
| + | =====Phase 2===== |
||
| + | This phase begins as soon as the first phase's bosses are defeated. |
||
| + | *Super Statue (x1) |
||
| + | |||
| + | ===Tips=== |
||
| + | *Ice is your friend, especially at the last stage. With it, your foes will be left helpless, as they cannot move. |
||
| + | *Quickly take out each wave for one bonus meat. |
||
| + | *Use the map's elements to your advantage. Last session, certain enemies could be easily destroyed by the middle ballistas. |
||
[[Category:Online Multiplayer]] |
[[Category:Online Multiplayer]] |
||
[[Category:Co-op]] |
[[Category:Co-op]] |
||
Latest revision as of 06:51, 30 January 2018
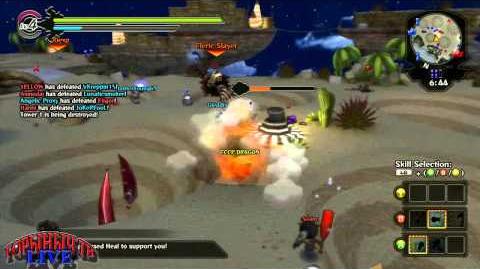
Happy Wars - Special Challenge (Game 2)-0
Gameplay of the Special Challenge


Rules of Special Challenge
- All Towers are controlled by the enemy at the start.
- Causing even a slight amount of damage to an enemy Tower will result in a Slayer spawning.
- Slayers consist of a Warrior Slayer, Cleric Slayer, and Mage Slayer.
- Slayers are easily identified by the Tag above their head, as well as their giant like size. *Breaching the castle results in the extemely powerful enemy Boss entering the battle.
- You can only win the game by destroying the Big Tower.
- Bonus Monsters spawn at seemingly random points in the game. They often distract players from the objective, and can easily cause a winning game to end in a loss. Gold, which is the advanced version of the Bonus monster, will rarely attack players in her way. She can mostly one hit player, but has no defence except her speed. Sometimes, she will sucide either by falling off, falling in water, or get killed by terrain (Posion Water, Evil Fishies, etc.)
- A treasure Box containing Happy Stars or a special item is rewarded upon completion of a Special Challenge.
Special Challenge Reward System

.jpg)
Co-op rewards.
Special Challenge has two difficulties: Easy mode which has weaker AI's, a lower chance to drop a special item and
less co-op points, and hard mode which gives out special rewards at an increased rate, the AI however are tougher than normal. You get extra co-op points for completing hard mode.
Introduced as a more recent addition, Special Challenges now feature a boss killing reward at the end of every game. The more damage you do to the big boss at the end, the greater your chances of getting a special item at the end of the game. Putting the buff "Monster Slayer" on your weapon will allow you do to more damage to bosses, and thus, increase the chance of getting a special item.
You can also sometimes earn special items in the Co-op rewards section.
Special Challenge Enemies
There are major differences in the enemies. Most AIs behave like normal Co-op AIs, but they

The Boss.
have the Slayers joining them to fight. The Slayers' high attack and defense numbers alone can cause allies major problems, but added to that Slayers are given a 40% damage boost to their designated slaying class. Having even one Slayer out, or worse all of them combined, can make the game almost impossible for players to win. If the team can make it to the castle after taking all Towers and killing all Slayers that spawn from them, they are faced with a more difficult opponent: The Boss known simply as DANGER! With extremely high Attack and Defense numbers and a swing radius half the length of the castle, this opponent can clear the castle of players in mere seconds of its arrival.
Special Challenge Strategy
There are two big decisions to make when trying to complete a Special Challenge:
1. Will you try to capture the Towers on the way to the enemy castle?
It is only recommended to take the Towers if you face the "Major Enemy" or on small to medium maps if you are confident in your teammates' abilities to kill or control the Slayers that will spawn. Note: The Slayers deal massive damage to your towers. Hold them down as best as you can.
No: Split your team between offense and defense, and go for a base rush. Have Clerics with dispel on defense, to keep your castle and your Big Tower safe. Then have some players go rush straight to the enemy castle. It is recommended to have at least two Clerics with resurrect, and two other players with high construction skills. Do not attack the enemy gate or touch the enemy Towers before you build the ram. Once you build the ram everyone should use it at the same time so it does extra damage. If the ram is broken, then attack the Gate.
Yes: Most of the team should stick together, use team skills, and push as a team. It may help if a weaker player distracts a few enemies around the enemy base.
2. Will you try to kill the Boss Monster, DANGER?
It is not recommended to try to kill the Boss Monster as it can be difficult and generally takes a long time. That is, unless you're interested in earning rewards. Many weekly missions require killing the boss, and it gives a huge boost to your progress towards co-op rewards. No guts, no glory!
No: It is easier to destroy the enemy Big Tower without killing DANGER by having multiple players, preferably with high construction skill, go straight for it while other players use the Cleric's Resurrect skill from atop the castle walls to revive them when they die. Just remember, VERY rarely the Boss (Rackham, Kentaur, Yggdrasil, Klymenos, Cassandro, Typhon, etc., the huge guy) will LEAVE the castle and advance towards your own. Things get slightly easier here, but he can smash your gates in seconds and can destroy your big tower almost immediately.
Yes: If you do decide to kill DANGER, the best strategy to fight him is to construct and use the Flower Cannon outside and the Ballistae inside the opponents' base and shoot him to death. Make sure the character class firing the cannon is not one the boss is immune to. Your team can also surround the boss with a mass attack using the character class he's not immune to. He'll freeze up and only be able to get a swing in every few seconds, making it easy to kill him quickly.
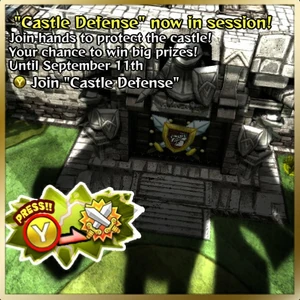
Castle Defense
Castle defense mode is a special challenge that differs from your average special challenge in the following ways:
- Most of the map is blocked off.
- You only have limited space.
- You must stop a horde of enemies from taking down your big tower.
- Slayers are weaker and only come in one wave.
- You must survive 4 waves, each wave getting increasingly harder and harder, as enemies have more attack power and HP. There are 2 bonus rounds if you manage to beat the initial rounds fast enough.
- You have a 25:00 time limit.
New enemies also make an apperance. Attack proof is a monster that obviously takes almost no damage from regular attacks. Ballista proof is a monster that obviously takes almost no damage from ballistae. Magic proof is a monster which obviously takes almost no damage from magic attacks. Bomb monster are monsters that have a considerably good amount of HP. When it is killed, it explodes, which has a high chance of instantly killing a player. And finally, the Gate Crasher, which is a monster that doesn't attack, but is a drilling monster which moves slowly. When it touches your castle gate, it will destroy it.

Tips
- Ballistae and Gatling Guns play a key role in this challenge. Always have a Cleric and/or Engineer inside to repair and/or rebuild them immediatley.
- 4-5 players outside is OK.
- Remember This: There's only 8 of you on the ally team and hordes of enimies. Balance your teams positions wisely.
- Having Tactical Power Up and Cannon (Durability, Shots, Accuracy) Buffs helps a lot when on a Ballista/Gatling Gun.
- Be aware of your surroundings. Enemies in this mode love to sneak to the sides of the Castle and build ladders. Especially on Wave 4.
- On Wave 4, it is best to stay inside beacuse enemies build ladders a lot on this wave.
- Dispel works wonders on Castle Defense. Use it to remove Summoned Materials for cannons, rams, and ladders.
- Complete your waves as quick as possible. Remember, you have a time limit. Completing the waves quickly will also result in a bonus Happy Meat.
- Happy Meat is meat gained for every 150exp you earn. At the end of each wave, you can spend your meat on more HP, AP, fortify a cannon, enhance your magic attack or attack, or spend it on more meat, making it require less exp for meat.
- Use Cheer or Sacred Song or Meteor Storm in between waves.
- When your gate is breached, use a Beserker or Zephyr to keep enemies away from the big tower. A Cleric's wall also helps.
- Use Ballistae and magic attacks for Slayers, Proof-Golems (Attack, Magic, etc.(depending on Golem)), and Gate Crushers.
- Communicate with your ally team, use mics or invite them to a party since Castle Defense has only 8 players.
- Engineers are invaluable teammates as they can update materials and even repair the gate to keep defenses up as long as possible. It is usually recommended to keep them inside to castle to attack with Ballistae/Gatling Guns.
- Try to prevent the gate from being destroyed as long as possible. Having it destroyed will likely force the entire team to stay within the castle walls, which will often leads to more enemies entering the castle due to the lack of defenses outside the walls; enemies will also build ladders to enter the castle, which will cause enemies to come from three directions to the tower.
Notes
Occasionally, the game will glitch during/after Round 1. This causes a new wave of enemies to appear along with them having strange behaviors. Because of this, it will often result in the players running out of time.
Boss Crushers
This Special Challenge is an endurance-type match. As of right now, it only has appeared mid-March 2014.
Rules
- There are 5 stages, as well as 3 bonus stages for teams that clear with at least 2 minutes remaining.
- Defeat the boss(es) of each round to advance.
- You have to clear all 5 rounds, or else you lose.
- Destroying the Big Tower has no effect on the match.
The Rounds have a pre-determined set of bosses to choose from. Below is the list:
Boss List
Each bullet point represents one group of bosses.
Round 1
- Class Slayer Team (x Regular Slayers, 1 Super Slayer)
- Golem Team (1 Resist-Attack, Resist-Ballista, 1 Resist-Magic)
Round 2
- Lineman
- Bomb Monster
Round 3
- Thinking Bird (x5)
- Vampire
- Spartan Team
Round 4
- Werewolf (x3)
- Dwarf Family
- Dark Princess
Round 5
This round comes in two phases.
Phase 1
- Demon Lemur Statue (x3)
Phase 2
This phase begins as soon as the first phase's bosses are defeated.
- Super Statue (x1)
Tips
- Ice is your friend, especially at the last stage. With it, your foes will be left helpless, as they cannot move.
- Quickly take out each wave for one bonus meat.
- Use the map's elements to your advantage. Last session, certain enemies could be easily destroyed by the middle ballistas.